What Are Environment Variables ?
Storing credentials like access keys, secret keys, SMTP passwords, etc in the source is never a good idea, especially in production; Because it may be vulnerable to hacks or you might want to share the source code with other developers. So, there are Environment Variables for that. We can use environment variables to store various credentials as well as configuration parameters for our app.
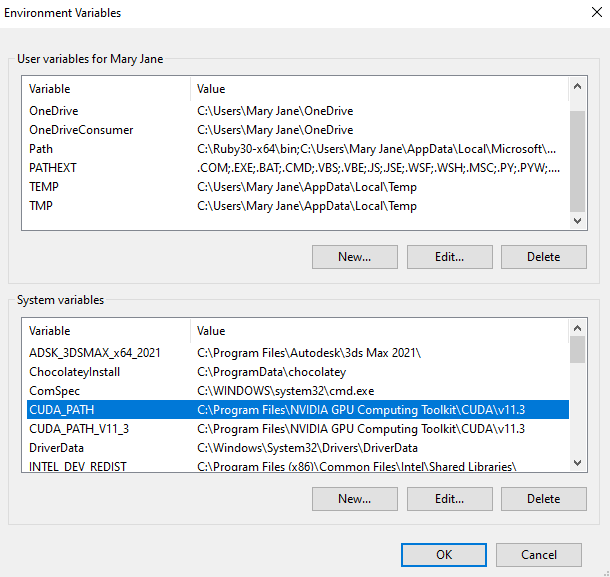
Environment Vars(or ENV Vars for short), are stored in the operating system of the application server or the container or wherever your app is running. In the example below; you can see the ENV Vars of my windows machine, same goes for other operating systems or containers as well. ENV vars can be accessed globally by any application running on the server or the container. ENV vars can be added, removed as well as modified by the user.

More On Environment Variables: https://docs.ruby-lang.org/en/master/ENV.html
Ruby Guides On Environment Variables: https://www.rubyguides.com/2019/01/ruby-environment-variables
Using Environment Variables In Heroku
If you want to use Environment Variables on heroku, you can do it right away from the dashboard or you can use heroku CLI. If you wan to do it from the dashboard, you can navigate to you app’s settings tab, and then click on ‘Reveal Config Vars’ in the config vars section. You can now add, remove or modify any config vars from here.

Using the CLI
And if you wanted to do it from the CLI, make sure to login at first, with heroku login command. After logging in, you can run heroku config to view the config/ENV vars associated with you app on heroku.

Adding New Vars
To add any new config/ENV vars, you can use heroku config:set with your desired variables. For example;
heroku config:set YOUR_VAR_KEY_NAME:YOUR_VAR_VALUE

heroku config:set S3_BUCKET_NAME:my_bucket123
Removing Vars
To remove any existing config/ENV vars, you can use heroku config:unset. For example;
heroku config:unset YOUR_VAR_KEY_NAME

heroku config:unset S3_BUCKET_NAME
Using ENV Vars in Rails
After adding config/ENV vars on heroku, you’ll have to configure rails to use those vars. Let me show you a few examples.
Database Credentials
To use database credentials; you’ll have to change a few lines in your database.yml config file, located in config/database.yml. You can add your database credentials like the one you can see below. Make sure there’s no typo both in your heroku config vars as well as in your config file. If you’re using heroku postgres; user DATABASE_URL.
Heroku Postgres Guide: https://devcenter.heroku.com/articles/heroku-postgresql
#File: config/database.yml
##...Other Configs
production:
adapter: postgresql
host: <%= ENV['DB_HOST'] %>
port: <%= ENV['DB_PORT'] %>
database: <%= ENV['DB_NAME'] %>
username: <%= ENV['DB_USER'] %>
password: <%= ENV['DB_PASS'] %>

##...Other Configs
Storage Credentials
Same goes for storage too, here i’m using active storage, so this is how my storage config looks like. I have already added my config vars in heroku ACCESS_KEY ACCESS_KEY_ID BUCKET_NAMEand so on.
Active Storage Guide: https://edgeguides.rubyonrails.org/active_storage_overview.html
#File: config/storage.yml
##...Other Configs

digitalocean:
service: S3
access_key_id: <%= ENV['ACCESS_KEY'] %>
secret_access_key: <%= ENV['SECRET_KEY'] %>
region: <%= ENV['REGION'] %>
bucket: <%= ENV['BUCKET_NAME'] %>
endpoint: <%= ENV['ENDPOINT'] %>

##...Other Configs
SMTP Credentials
And for sending SMTP mails, i use sendgrid, if you’d also like to use sendgrid you can add it from heroku elements marketplace. After adding sendgrid from heroku elements, those ENV vars will automatically be added to your app, SMTP_SERVER, SMTP_PORT, etc. Please note: there may be slight changes in the config names, as i modified a few of them, please make sure to add the correct ones; check them in your heroku config vars, from the dashboard.
Action Mailer Guide: https://guides.rubyonrails.org/action_mailer_basics.html
Sendgrid Guide: https://devcenter.heroku.com/articles/sendgrid
#File: config/environments/production.rb
##...Other Configs
config.action_mailer.smtp_settings = {
:address => ENV['SMTP_SERVER'],
:port => ENV['SMTP_PORT'],
:user_name => ENV['SMTP_USERNAME'],
:password => ENV['SMTP_PASSWORD'],
:authentication => :login,
:tls => :true,
:enable_starttls_auto => true
}

##...Other Configs
Final Thoughts
So, that was all about Environment Variables on Heroku. While adding new Environment Variables, please make sure that there’s no typo and also make sure that your rails app is configured properly to use those Environment Variables. And, If you face any issues, please make sure to leave a comment below. So that’s all for today, have a nice day.
